> ## Documentation Index
> Fetch the complete documentation index at: https://docs.corbado.com/llms.txt
> Use this file to discover all available pages before exploring further.
# Local Multi-Device Testing with ngrok
> Use ngrok to develop and test with multiple devices locally on your machine.
## Overview
[ngrok](https://ngrok.com/) makes local web applications reachable over the internet with a single command. The following steps show the setup and usage of ngrok for testing your Corbado setup locally with multiple devices.
This guide assumes that you've set up your account in the Corbado developer
panel. If you haven't done so, please check [Getting
Started](/corbado-connect/overview/getting-started).
Testing your local setup with ngrok allows Corbado to communicate with your local system, e.g. to access the application from different devices. In production or staging mode, systems are often accessible over the Internet anyways but for local developing and testing, ngrok saves a ton of work.
1. [ngrok setup](#1-ngrok-setup)
2. [Run your application](#2-run-your-application)
3. [Set the ngrok URL in the Corbado developer panel](#3-set-the-ngrok-url-in-the-corbado-developer-panel)
4. [Update your Relying Party ID](#4-update-your-relying-party-id)
## 1. ngrok setup
1. Sign up for a free ngrok account at [https://dashboard.ngrok.com/signup](https://dashboard.ngrok.com/signup) and follow the instructions.
2. Install ngrok from [https://dashboard.ngrok.com/get-started/setup](https://dashboard.ngrok.com/get-started/setup)[.](https://ngrok.com/download)
3. Go to the "[Your Authtoken](https://dashboard.ngrok.com/get-started/your-authtoken)" section in the ngrok dashboard. There, copy your token and add it to your ngrok installation by executing:
```sh theme={null}
ngrok config add-authtoken
```
## 2. Run your application
For this guide, we assume you are using a Node.js app. If you are using a different framework / programming language, just change the run commands to start your (backend) application.
### 2.1 Install the dependencies and run the (backend) application
```sh theme={null}
# Node.js example
npm install
npm run start
```
### 2.2 Launch ngrok to connect it to your application
The `ngrok http ` command starts the ngrok tunnel on the specified port. Our application runs on port 8080, so we'll execute
```shell theme={null}
ngrok http 8080
```
The terminal will display something like the following:
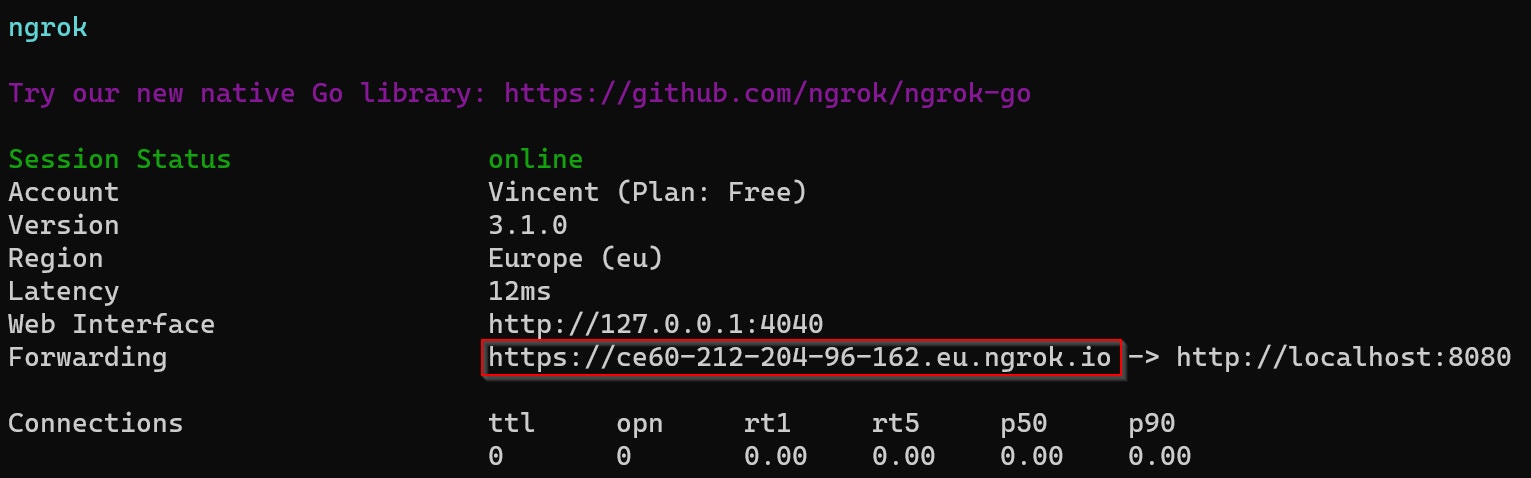 Copy the ngrok URL in the red box which is needed for the Corbado developer panel.
Please open the ngrok URL in the browser before proceeding and confirm the usage.
Please use the ngrok URL as testing URL (instead of localhost) in your browser!
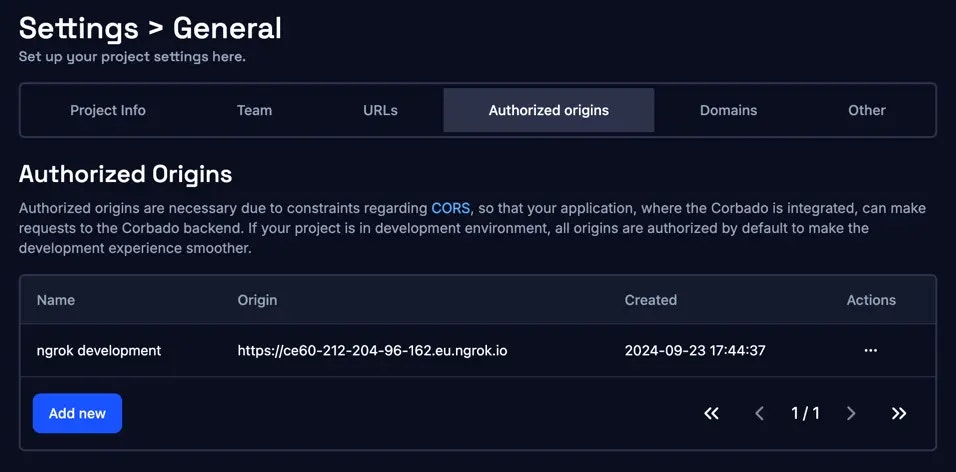
## 3. Set the ngrok URL in the Corbado developer panel
Note that this step is **only required** if your project is in **PROD environment**. If you are in DEV environment, you can skip this.
Add a new authorized origin with the ngrok URL and add localhost, including protocol (http) and port in [Settings > General > Authorized origins](https://app.corbado.com/settings/general?tab=Authorized+origins):
Copy the ngrok URL in the red box which is needed for the Corbado developer panel.
Please open the ngrok URL in the browser before proceeding and confirm the usage.
Please use the ngrok URL as testing URL (instead of localhost) in your browser!
## 3. Set the ngrok URL in the Corbado developer panel
Note that this step is **only required** if your project is in **PROD environment**. If you are in DEV environment, you can skip this.
Add a new authorized origin with the ngrok URL and add localhost, including protocol (http) and port in [Settings > General > Authorized origins](https://app.corbado.com/settings/general?tab=Authorized+origins):
 ## 4. Update your Relying Party ID
As passkeys / WebAuthn are phishing-resistant and passkeys are bound to a domain during creation ([Relying Party ID](/corbado-connect/helpful-guides/passkeys/relying-party-id)), you need to make sure that the browser URL is the same domain or a subdomain of the [Relying Party ID](/corbado-connect/helpful-guides/passkeys/relying-party-id). Thus, you need to update the [Relying Party ID](/corbado-connect/helpful-guides/passkeys/relying-party-id) for ngrok as well:
## 4. Update your Relying Party ID
As passkeys / WebAuthn are phishing-resistant and passkeys are bound to a domain during creation ([Relying Party ID](/corbado-connect/helpful-guides/passkeys/relying-party-id)), you need to make sure that the browser URL is the same domain or a subdomain of the [Relying Party ID](/corbado-connect/helpful-guides/passkeys/relying-party-id). Thus, you need to update the [Relying Party ID](/corbado-connect/helpful-guides/passkeys/relying-party-id) for ngrok as well:
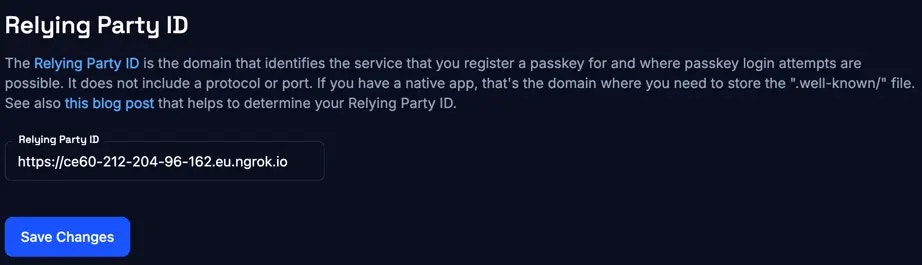 Note that all passkeys created for the existing Relying Party ID (e.g.
"localhost") are not working anymore, as well as creating passkeys from the
old domain doesn't work anymore as well.
Note that all passkeys created for the existing Relying Party ID (e.g.
"localhost") are not working anymore, as well as creating passkeys from the
old domain doesn't work anymore as well.