> ## Documentation Index
> Fetch the complete documentation index at: https://docs.corbado.com/llms.txt
> Use this file to discover all available pages before exploring further.
# Native/Mobile Application
> Discover how to configure the RPID for your application, particularly in complex scenarios involving both web and native/mobile applications running in parallel.
Try Demo
Talk to Adoption Engineer
Whitepaper
## 1. Introduction
While **RPID** configuration for web applications is straightforward and based on the application's [origin](https://developer.mozilla.org/en-US/docs/Glossary/Origin), native/mobile applications present unique challenges. Unlike web browsers, native/mobile applications don't operate within the traditional concept of web [origins](https://developer.mozilla.org/en-US/docs/Glossary/Origin) and domains. This fundamental difference requires a special approach to establish trust between your domain and your native/mobile applications.
To enable passkey functionality in native environments, you need to create a secure association between your application and your domain. This is achieved through platform-specific association files:
* For **iOS** applications, this involves configuring an **AASA (Apple App Site Association)** and **entitlements** file
* For **Android** applications, you need to configure a **Digital Asset Links** file (referred to as **Asset Links** file hereafter)
These association files serve as digital proof that your native/mobile application is authorized to use passkeys associated with your **RPID** (domain). This security measure ensures that only legitimate applications can access and manage passkeys, preventing potential security vulnerabilities.
## 2. iOS
Configuring passkey support for **iOS** applications requires careful setup of the relationship between your application and your **RPID**. This involves creating and configuring multiple components that work together to establish a secure, trusted connection.
Before you test passkeys on the **iOS** simulator and physical devices, ensure you configure the necessary settings. For detailed instructions, refer to our [iOS Testing Guide](/corbado-connect/helpful-guides/ios-testing).
Let's explore each of these components in detail.
### 2.1. AASA and entitlements files
The trust relationship between your **iOS** application and your **RPID** is established through two key files:
* An **AASA** file [hosted](#2-3-hosting-the-aasa-file) on your **RPID** (domain) that specifies which applications are allowed to use passkeys for this **RPID**
* An **entitlements** file in your **iOS** application that declares what **RPIDs** it wants to use for passkeys
For the next sections, we assume that the **RPID** is `example.com`.
#### 2.1.1 AASA File
The **AASA** file is a JSON configuration file [hosted](#2-3-hosting-the-aasa-file) on your **RPID** (domain):
`https://example.com/.well-known/apple-app-site-association`
Below is an example of a complete **AASA** file. The crucial section for passkeys is the `webcredentials` object, where you specify which **iOS** applications (identified by their **Application Identifier Prefix** and **Bundle ID**) are authorized to use passkeys for this **RPID**:
```json theme={null}
{
"appclips": {
"apps": []
},
"applinks": {
"details": [
{
"appID": "T9A667JL6T.com.example.app",
"paths": [
"*"
]
}
]
},
"webcredentials": {
"apps": [
"T9A667JL6T.com.example.app"
]
}
}
```
`T9A667JL6T` is the **Application Identifier Prefix** and `com.example.app` is the **Bundle ID**, see [below](#2-2-application-identifier-prefix-and-bundle-identifier) to learn more about these identifiers.
#### 2.1.2 Entitlements File
The **entitlements** file completes the trust circle by declaring which **RPIDs** your **iOS** application wants to access. This file must be included in your **iOS** application's project:
```xml Example.entitlements theme={null}
com.apple.developer.associated-domains
webcredentials:example.com
```
The relevant part here is the `webcredentials:example.com` entry. This entry tells **iOS** where to look for the **AASA** file.
#### 2.1.3 Trust Establishment Process
The following diagram illustrates how these files work together to establish trust:
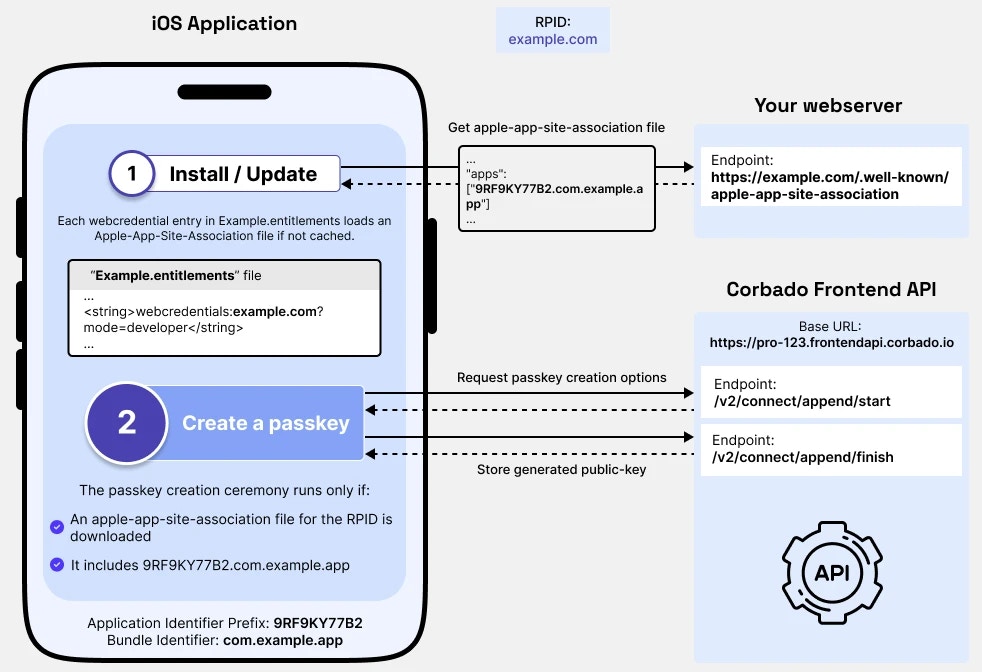 Here's the complete flow:
1. The **RPID** has been [configured](https://app.corbado.com/settings/general?tab=URLs) as `example.com`
2. The same **RPID** has been added to the **entitlements** file using the `webcredentials:` prefix
3. When your **iOS** application is installed or updated:
* **iOS** reads the **entitlements** file
* Fetches the **AASA** file from `https://example.com/.well-known/apple-app-site-association`
* Verifies that your **iOS** application's identifiers are listed in the `webcredentials.apps` section
4. If verification succeeds, your **iOS** application is authorized to use passkeys for the specified **RPID**
Apple aggressively caches **AASA** files. During development, append `?mode=developer` to bypass this caching when accessing your **AASA** file. This only works if you have enabled **Associated Domains Development** on your device ([see iOS Testing Guide](/corbado-connect/helpful-guides/ios-testing#2-2-enable-associated-domains-development)).
### 2.2. Application Identifier Prefix and Bundle Identifier
The **AASA** file references your **iOS** application using two unique identifiers that work together to uniquely identify your application.
#### 2.2.1 Bundle Identifier
The **Bundle Identifier** (or **Bundle ID**) is a unique identifier for your **iOS** application that you configure in Xcode. It follows a reverse-domain naming pattern:
```
com.example.app
```
Best practices for **Bundle IDs**:
* Use reverse-domain notation (e.g., `com.yourcompany.appname`)
* Only use alphanumeric characters, hyphens, and periods
* Keep it lowercase to avoid confusion
* Choose a name that will remain unique and consistent
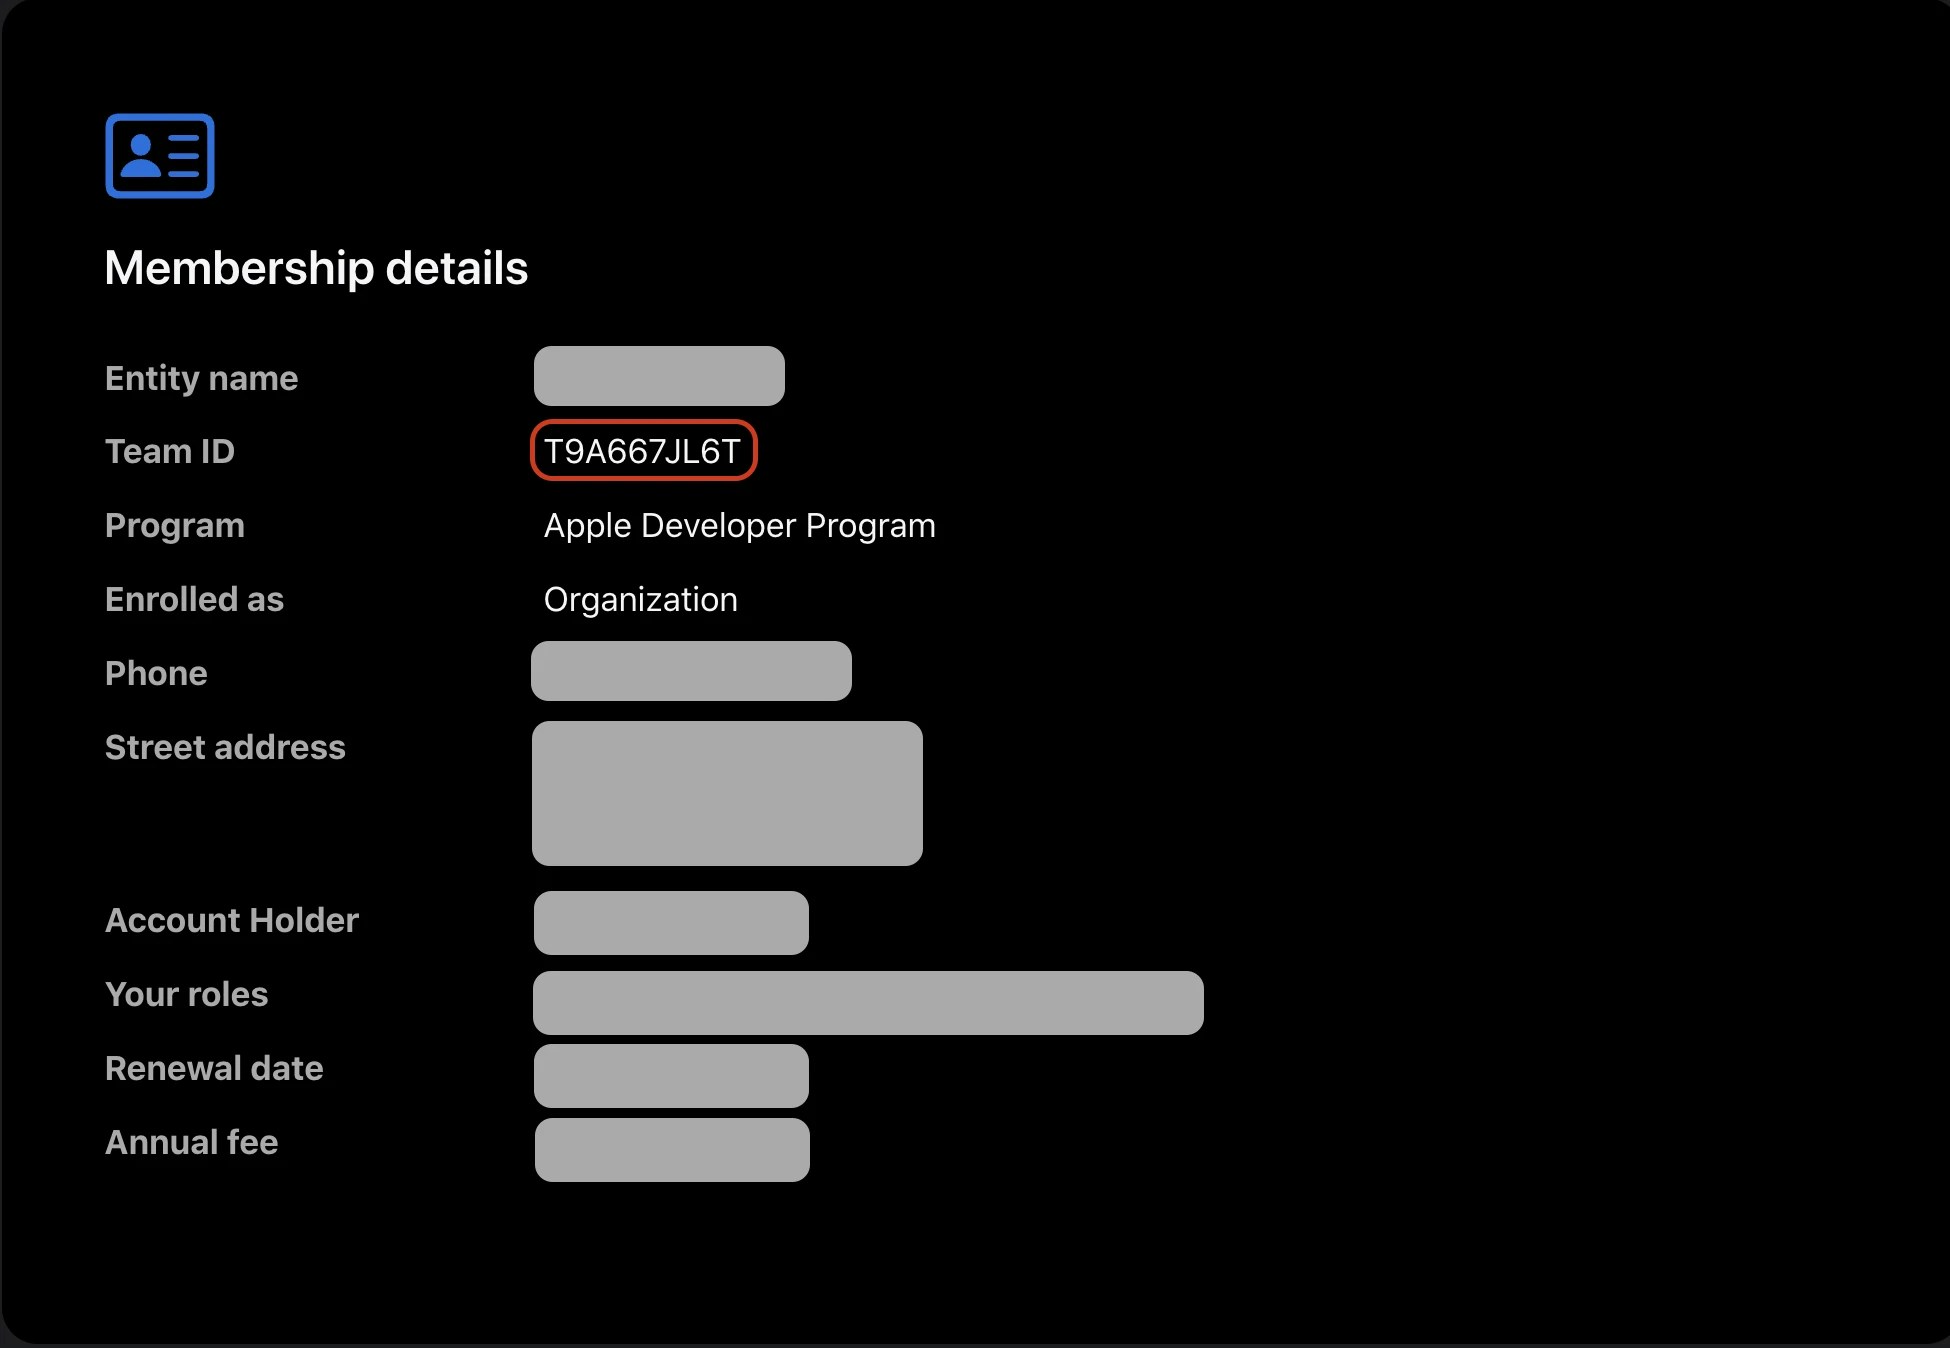
#### 2.2.2 Application Identifier Prefix
The **Application Identifier Prefix** (also known as **Team ID**) is a unique identifier assigned by Apple to your development team. You can find it in the Apple Developer Portal under "Membership":
Here's the complete flow:
1. The **RPID** has been [configured](https://app.corbado.com/settings/general?tab=URLs) as `example.com`
2. The same **RPID** has been added to the **entitlements** file using the `webcredentials:` prefix
3. When your **iOS** application is installed or updated:
* **iOS** reads the **entitlements** file
* Fetches the **AASA** file from `https://example.com/.well-known/apple-app-site-association`
* Verifies that your **iOS** application's identifiers are listed in the `webcredentials.apps` section
4. If verification succeeds, your **iOS** application is authorized to use passkeys for the specified **RPID**
Apple aggressively caches **AASA** files. During development, append `?mode=developer` to bypass this caching when accessing your **AASA** file. This only works if you have enabled **Associated Domains Development** on your device ([see iOS Testing Guide](/corbado-connect/helpful-guides/ios-testing#2-2-enable-associated-domains-development)).
### 2.2. Application Identifier Prefix and Bundle Identifier
The **AASA** file references your **iOS** application using two unique identifiers that work together to uniquely identify your application.
#### 2.2.1 Bundle Identifier
The **Bundle Identifier** (or **Bundle ID**) is a unique identifier for your **iOS** application that you configure in Xcode. It follows a reverse-domain naming pattern:
```
com.example.app
```
Best practices for **Bundle IDs**:
* Use reverse-domain notation (e.g., `com.yourcompany.appname`)
* Only use alphanumeric characters, hyphens, and periods
* Keep it lowercase to avoid confusion
* Choose a name that will remain unique and consistent
#### 2.2.2 Application Identifier Prefix
The **Application Identifier Prefix** (also known as **Team ID**) is a unique identifier assigned by Apple to your development team. You can find it in the Apple Developer Portal under "Membership":
 #### 2.2.3 Combined Usage
These identifiers are combined in the **AASA** file forming a unique identifier for your **iOS** application, for example:
```
T9A667JL6T.com.example.app
```
### 2.3. Hosting the AASA file
#### 2.3.1 Development Environment
For development and testing, **Corbado Connect** provides a pre-configured **AASA** file through the Corbado Frontend API:
```
https://.frontendapi.cloud.corbado.io/.well-known/apple-app-site-association
```
To use this during development:
1. Set your **RPID** to `.frontendapi.cloud.corbado.io`
2. Configure your **Application Identifier Prefix** and **Bundle ID** in the [Corbado Management Console](https://app.corbado.com/pro-8081086374374980670/settings/native-apps)
This setup is only suitable for development. For production, you must host the **AASA** file on your own domain to match your production **RPID**.
#### 2.3.2 Production Environment
In production, the **AASA** file must be hosted on your domain that matches your **RPID**. For example, if your **RPID** is `example.com`, the **AASA** file must be accessible at:
```
https://example.com/.well-known/apple-app-site-association
```
You have two options for hosting the file:
1. Download the **AASA** file from Corbado Frontend API
2. Host it on your webserver at `/.well-known/apple-app-site-association`
3. Ensure it's served with the correct content type: `application/json`
**Advantages:**
* Simple to set up
* No dependency on Corbado Frontend API
* Better performance
* Works even if Corbado Frontend API is temporarily unavailable
**Disadvantages:**
* You have to manually update the file
Create a proxy rule on your webserver to forward requests to Corbado Frontend API:
**Nginx Example:**
```nginx theme={null}
location /.well-known/apple-app-site-association {
proxy_pass https://.frontendapi.cloud.corbado.io/.well-known/apple-app-site-association;
proxy_set_header Host $host;
proxy_ssl_server_name on;
}
```
**Advantages:**
* Always serves the latest version
* No need to manually update the file
**Disadvantages:**
* Depends on Corbado Frontend API availability
* Slightly higher latency
* More complex configuration
We recommend Option 1 (Static File Hosting) because:
* The **AASA** file rarely changes
* It provides better reliability and performance
* It's simpler to set up and maintain
## 3. Android
Configuring passkey support for **Android** applications requires establishing a trust relationship between your application and your **RPID**. This involves creating and configuring specific files and settings to verify your application's ownership of the domain.
Before you test passkeys on the **Android** emulator, ensure you configure the necessary settings. For detailed instructions, refer to our [Android Testing Guide](/corbado-connect/helpful-guides/android-testing).
### 3.1. Asset Links file and keystore
The trust relationship between your **Android** application and your **RPID** is established through two key components:
* An **Asset Links** file [hosted](#3-3-hosting-the-asset-links-file) on your **RPID** (domain) that specifies which applications are allowed to use passkeys for this **RPID**
* A **keystore** file in your **Android** application that contains the certificate used to sign your application
For the next sections, we assume that the **RPID** is `example.com`.
#### 3.1.1 Asset Links File
The **Asset Links** file is a JSON configuration file [hosted](#3-3-hosting-the-asset-links-file) on your **RPID** (domain):
`https://example.com/.well-known/assetlinks.json`
Below is an example of a complete **Asset Links** file. The crucial section is the `delegate_permission/common.get_login_creds` relation, which authorizes specific **Android** applications (identified by their **Package Name** and **SHA-256 Certificate Fingerprint**) to use passkeys for this **RPID**:
```json theme={null}
[{
"relation": ["delegate_permission/common.get_login_creds"],
"target": {
"namespace": "android_app",
"package_name": "com.example.app",
"sha256_cert_fingerprints": [
"12:34:56:78:9A:BC:DE:F0:12:34:56:78:9A:BC:DE:F0:12:34:56:78:9A:BC:DE:F0:12:34:56:78:9A:BC:DE:F0"
]
}
}]
```
`com.example.app` is the **Package Name** and the SHA-256 string is your application's **Certificate Fingerprint**, see [below](#3-2-package-name-and-fingerprint) to learn more about these identifiers.
#### 3.1.2 Keystore File
The **keystore** file is a container that stores your application's signing certificates. Android requires all applications to be digitally signed with a certificate before they can be installed. This certificate, stored in the keystore, is used to generate the **SHA-256 Certificate Fingerprint** that appears in the **Asset Links** file.
You typically have two keystores:
* A debug keystore (automatically created by Android Studio)
* A release keystore (that you create for production releases)
To create a release keystore:
```bash theme={null}
keytool -genkey -v -keystore release-key.jks -alias your-app-alias -keyalg RSA -keysize 2048 -validity 10000
```
To view certificate information and get the SHA-256 fingerprint:
```bash theme={null}
keytool -list -v -keystore your-keystore.jks -alias your-alias -storepass your-storepass
```
Configure the keystore in your application's `build.gradle` file:
```groovy theme={null}
android {
signingConfigs {
release {
storeFile file("release-key.jks")
storePassword "your-store-password"
keyAlias "your-app-alias"
keyPassword "your-key-password"
}
}
buildTypes {
release {
signingConfig signingConfigs.release
}
}
}
```
Never commit your keystore files or passwords to version control. Instead:
* Store the keystore file securely
* Use environment variables or a secure key management system for passwords
* Keep a secure backup of your release keystore - losing it means you can't update your app!
#### 3.1.3 Trust Establishment Process
The following diagram illustrates how these components work together to establish trust:
#### 2.2.3 Combined Usage
These identifiers are combined in the **AASA** file forming a unique identifier for your **iOS** application, for example:
```
T9A667JL6T.com.example.app
```
### 2.3. Hosting the AASA file
#### 2.3.1 Development Environment
For development and testing, **Corbado Connect** provides a pre-configured **AASA** file through the Corbado Frontend API:
```
https://.frontendapi.cloud.corbado.io/.well-known/apple-app-site-association
```
To use this during development:
1. Set your **RPID** to `.frontendapi.cloud.corbado.io`
2. Configure your **Application Identifier Prefix** and **Bundle ID** in the [Corbado Management Console](https://app.corbado.com/pro-8081086374374980670/settings/native-apps)
This setup is only suitable for development. For production, you must host the **AASA** file on your own domain to match your production **RPID**.
#### 2.3.2 Production Environment
In production, the **AASA** file must be hosted on your domain that matches your **RPID**. For example, if your **RPID** is `example.com`, the **AASA** file must be accessible at:
```
https://example.com/.well-known/apple-app-site-association
```
You have two options for hosting the file:
1. Download the **AASA** file from Corbado Frontend API
2. Host it on your webserver at `/.well-known/apple-app-site-association`
3. Ensure it's served with the correct content type: `application/json`
**Advantages:**
* Simple to set up
* No dependency on Corbado Frontend API
* Better performance
* Works even if Corbado Frontend API is temporarily unavailable
**Disadvantages:**
* You have to manually update the file
Create a proxy rule on your webserver to forward requests to Corbado Frontend API:
**Nginx Example:**
```nginx theme={null}
location /.well-known/apple-app-site-association {
proxy_pass https://.frontendapi.cloud.corbado.io/.well-known/apple-app-site-association;
proxy_set_header Host $host;
proxy_ssl_server_name on;
}
```
**Advantages:**
* Always serves the latest version
* No need to manually update the file
**Disadvantages:**
* Depends on Corbado Frontend API availability
* Slightly higher latency
* More complex configuration
We recommend Option 1 (Static File Hosting) because:
* The **AASA** file rarely changes
* It provides better reliability and performance
* It's simpler to set up and maintain
## 3. Android
Configuring passkey support for **Android** applications requires establishing a trust relationship between your application and your **RPID**. This involves creating and configuring specific files and settings to verify your application's ownership of the domain.
Before you test passkeys on the **Android** emulator, ensure you configure the necessary settings. For detailed instructions, refer to our [Android Testing Guide](/corbado-connect/helpful-guides/android-testing).
### 3.1. Asset Links file and keystore
The trust relationship between your **Android** application and your **RPID** is established through two key components:
* An **Asset Links** file [hosted](#3-3-hosting-the-asset-links-file) on your **RPID** (domain) that specifies which applications are allowed to use passkeys for this **RPID**
* A **keystore** file in your **Android** application that contains the certificate used to sign your application
For the next sections, we assume that the **RPID** is `example.com`.
#### 3.1.1 Asset Links File
The **Asset Links** file is a JSON configuration file [hosted](#3-3-hosting-the-asset-links-file) on your **RPID** (domain):
`https://example.com/.well-known/assetlinks.json`
Below is an example of a complete **Asset Links** file. The crucial section is the `delegate_permission/common.get_login_creds` relation, which authorizes specific **Android** applications (identified by their **Package Name** and **SHA-256 Certificate Fingerprint**) to use passkeys for this **RPID**:
```json theme={null}
[{
"relation": ["delegate_permission/common.get_login_creds"],
"target": {
"namespace": "android_app",
"package_name": "com.example.app",
"sha256_cert_fingerprints": [
"12:34:56:78:9A:BC:DE:F0:12:34:56:78:9A:BC:DE:F0:12:34:56:78:9A:BC:DE:F0:12:34:56:78:9A:BC:DE:F0"
]
}
}]
```
`com.example.app` is the **Package Name** and the SHA-256 string is your application's **Certificate Fingerprint**, see [below](#3-2-package-name-and-fingerprint) to learn more about these identifiers.
#### 3.1.2 Keystore File
The **keystore** file is a container that stores your application's signing certificates. Android requires all applications to be digitally signed with a certificate before they can be installed. This certificate, stored in the keystore, is used to generate the **SHA-256 Certificate Fingerprint** that appears in the **Asset Links** file.
You typically have two keystores:
* A debug keystore (automatically created by Android Studio)
* A release keystore (that you create for production releases)
To create a release keystore:
```bash theme={null}
keytool -genkey -v -keystore release-key.jks -alias your-app-alias -keyalg RSA -keysize 2048 -validity 10000
```
To view certificate information and get the SHA-256 fingerprint:
```bash theme={null}
keytool -list -v -keystore your-keystore.jks -alias your-alias -storepass your-storepass
```
Configure the keystore in your application's `build.gradle` file:
```groovy theme={null}
android {
signingConfigs {
release {
storeFile file("release-key.jks")
storePassword "your-store-password"
keyAlias "your-app-alias"
keyPassword "your-key-password"
}
}
buildTypes {
release {
signingConfig signingConfigs.release
}
}
}
```
Never commit your keystore files or passwords to version control. Instead:
* Store the keystore file securely
* Use environment variables or a secure key management system for passwords
* Keep a secure backup of your release keystore - losing it means you can't update your app!
#### 3.1.3 Trust Establishment Process
The following diagram illustrates how these components work together to establish trust:
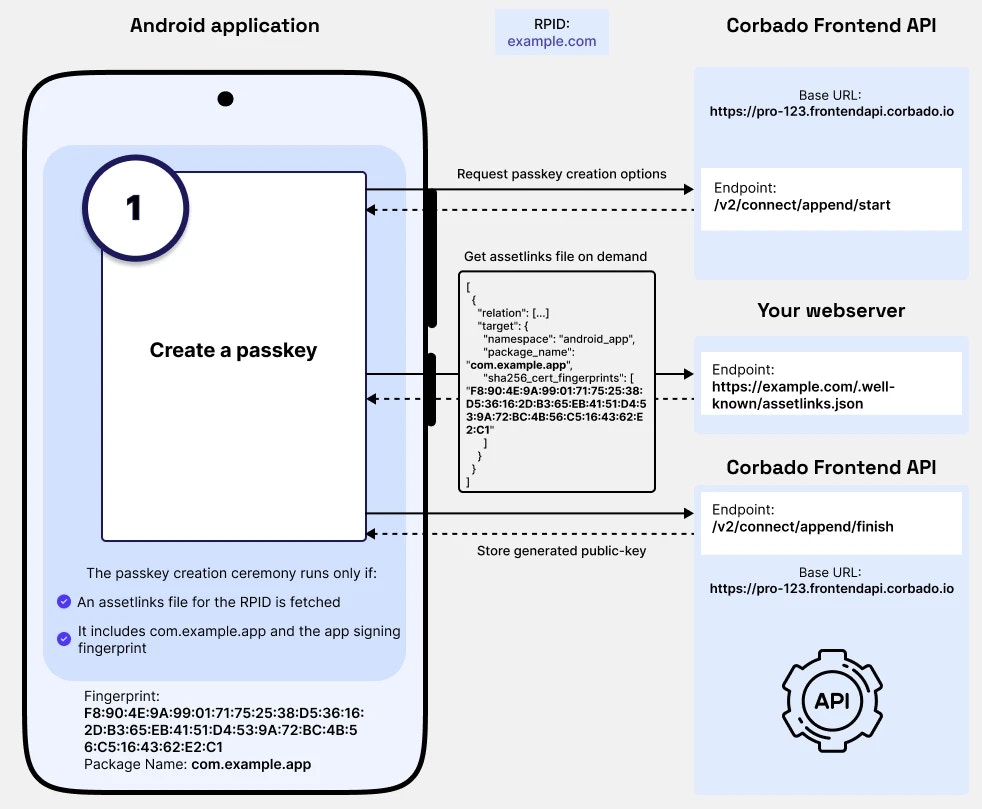 Here's the complete flow:
1. The **RPID** has been [configured](https://app.corbado.com/settings/general?tab=URLs) as `example.com`
2. Your **Android** application is signed using the certificate from your keystore
3. When your **Android** application attempts to use passkeys:
* **Android** fetches the **Asset Links** file from `https://example.com/.well-known/assetlinks.json`
* Calculates the SHA-256 fingerprint of your application's signing certificate
* Verifies that your application's **Package Name** and **Fingerprint** are listed in the file
4. If verification succeeds, your **Android** application is authorized to use passkeys for the specified **RPID**
### 3.2. Package Name and Fingerprint
The **Asset Links** file references your **Android** application using two unique identifiers that work together to uniquely identify your application.
#### 3.2.1 Package Name
The **Package Name** is a unique identifier for your **Android** application that you configure in your `build.gradle` file. It follows a reverse-domain naming pattern:
```groovy theme={null}
android {
defaultConfig {
applicationId "com.example.app"
}
}
```
Best practices for **Package Names**:
* Use reverse-domain notation (e.g., `com.yourcompany.appname`)
* Only use lowercase letters, numbers, and dots
* Choose a name that will remain unique and consistent
* Avoid using underscores or hyphens
#### 3.2.2 Fingerprint
The **SHA-256 Certificate Fingerprint** is a hash of the certificate used to sign your **Android** application. You can obtain it using the following command:
```bash theme={null}
keytool -list -v -keystore your-keystore.jks -alias your-alias -storepass your-storepass
```
### 3.3. Hosting the Asset Links file
#### 3.3.1 Development Environment
For development and testing, **Corbado Connect** provides a pre-configured **Asset Links** file through the Corbado Frontend API:
```
https://.frontendapi.cloud.corbado.io/.well-known/assetlinks.json
```
To use this during development:
1. Set your **RPID** to `.frontendapi.cloud.corbado.io`
2. Configure your **Package Name** and **Certificate Fingerprint** in the [Corbado Management Console](https://app.corbado.com/settings/native-apps)
This setup is only suitable for development. For production, you must host the **Asset Links** file on your own domain to match your production **RPID**.
#### 3.3.2 Production Environment
In production, the **Asset Links** file must be hosted on your domain that matches your **RPID**. For example, if your **RPID** is `example.com`, the file must be accessible at:
```
https://example.com/.well-known/assetlinks.json
```
You have two options for hosting the file:
1. Download the **Asset Links** file from Corbado Frontend API
2. Host it on your webserver at `/.well-known/assetlinks.json`
3. Ensure it's served with the correct content type: `application/json`
**Advantages:**
* Simple to set up
* No dependency on Corbado Frontend API
* Better performance
* Works even if Corbado Frontend API is temporarily unavailable
**Disadvantages:**
* You have to manually update the file
Create a proxy rule on your webserver to forward requests to Corbado Frontend API:
**Nginx Example:**
```nginx theme={null}
location /.well-known/assetlinks.json {
proxy_pass https://.frontendapi.cloud.corbado.io/.well-known/assetlinks.json;
proxy_set_header Host $host;
proxy_ssl_server_name on;
}
```
**Advantages:**
* Always serves the latest version
* No need to manually update the file
**Disadvantages:**
* Depends on Corbado Frontend API availability
* Slightly higher latency
* More complex configuration
We recommend Option 1 (Static File Hosting) because:
* The **Asset Links** file rarely changes
* It provides better reliability and performance
* It's simpler to set up and maintain
Here's the complete flow:
1. The **RPID** has been [configured](https://app.corbado.com/settings/general?tab=URLs) as `example.com`
2. Your **Android** application is signed using the certificate from your keystore
3. When your **Android** application attempts to use passkeys:
* **Android** fetches the **Asset Links** file from `https://example.com/.well-known/assetlinks.json`
* Calculates the SHA-256 fingerprint of your application's signing certificate
* Verifies that your application's **Package Name** and **Fingerprint** are listed in the file
4. If verification succeeds, your **Android** application is authorized to use passkeys for the specified **RPID**
### 3.2. Package Name and Fingerprint
The **Asset Links** file references your **Android** application using two unique identifiers that work together to uniquely identify your application.
#### 3.2.1 Package Name
The **Package Name** is a unique identifier for your **Android** application that you configure in your `build.gradle` file. It follows a reverse-domain naming pattern:
```groovy theme={null}
android {
defaultConfig {
applicationId "com.example.app"
}
}
```
Best practices for **Package Names**:
* Use reverse-domain notation (e.g., `com.yourcompany.appname`)
* Only use lowercase letters, numbers, and dots
* Choose a name that will remain unique and consistent
* Avoid using underscores or hyphens
#### 3.2.2 Fingerprint
The **SHA-256 Certificate Fingerprint** is a hash of the certificate used to sign your **Android** application. You can obtain it using the following command:
```bash theme={null}
keytool -list -v -keystore your-keystore.jks -alias your-alias -storepass your-storepass
```
### 3.3. Hosting the Asset Links file
#### 3.3.1 Development Environment
For development and testing, **Corbado Connect** provides a pre-configured **Asset Links** file through the Corbado Frontend API:
```
https://.frontendapi.cloud.corbado.io/.well-known/assetlinks.json
```
To use this during development:
1. Set your **RPID** to `.frontendapi.cloud.corbado.io`
2. Configure your **Package Name** and **Certificate Fingerprint** in the [Corbado Management Console](https://app.corbado.com/settings/native-apps)
This setup is only suitable for development. For production, you must host the **Asset Links** file on your own domain to match your production **RPID**.
#### 3.3.2 Production Environment
In production, the **Asset Links** file must be hosted on your domain that matches your **RPID**. For example, if your **RPID** is `example.com`, the file must be accessible at:
```
https://example.com/.well-known/assetlinks.json
```
You have two options for hosting the file:
1. Download the **Asset Links** file from Corbado Frontend API
2. Host it on your webserver at `/.well-known/assetlinks.json`
3. Ensure it's served with the correct content type: `application/json`
**Advantages:**
* Simple to set up
* No dependency on Corbado Frontend API
* Better performance
* Works even if Corbado Frontend API is temporarily unavailable
**Disadvantages:**
* You have to manually update the file
Create a proxy rule on your webserver to forward requests to Corbado Frontend API:
**Nginx Example:**
```nginx theme={null}
location /.well-known/assetlinks.json {
proxy_pass https://.frontendapi.cloud.corbado.io/.well-known/assetlinks.json;
proxy_set_header Host $host;
proxy_ssl_server_name on;
}
```
**Advantages:**
* Always serves the latest version
* No need to manually update the file
**Disadvantages:**
* Depends on Corbado Frontend API availability
* Slightly higher latency
* More complex configuration
We recommend Option 1 (Static File Hosting) because:
* The **Asset Links** file rarely changes
* It provides better reliability and performance
* It's simpler to set up and maintain