

1. Prerequisites
- An active Observe project in the Corbado management console
- Your authentication origins registered under Observe → Settings → Origins
- Your configured Autocapture snippet from Observe → Settings → Autocapture in the Management Console and the journeys it covers
- Separate projects for evaluation, staging and production so test traffic does not affect production reporting
2. How the setup works
The integration snippet loads your configured Autocapture code from Corbado and starts recording the agreed authentication journeys. Corbado configures and maintains the capture rules for your login. Your team adds the supplied snippet to your frontend and verifies that the agreed authentication journeys appear in Observe.Get your configured integration
Agree with Corbado on the entry points, authentication methods and outcomes to capture. Corbado configures and checks those journeys using test accounts or an agreed walkthrough for restricted flows. Copy the configured snippet from Observe → Settings → Autocapture. Coverage can expand as you add methods.
Add the integration snippet
Include the supplied integration snippet when your frontend starts and start capture immediately under your established collection policy.
Allow loading and event delivery
Add the supplied script origin, inline-script hash and API origin to your existing Content Security Policy, where required.
Verify your journeys
Walk the agreed login journeys and inspect them in Observe. Include failures, retries, method switches and the eventual outcome. See Verify your integration.
3. Deploy the script
Copy your configured integration from Observe → Settings → Autocapture in the Management Console. Your project ID and loader URL are already filled in. The page provides a compact HTML snippet, a module alternative and a delivery check to confirm that events arrive. Projects configured with a self-starting loader also show a Script tag option for setups such as a tag manager that can only add a script URL. Use one option per page. If your site uses a Content Security Policy (CSP), the same page also provides the matching SHA-256 hash and separate copyable additions for script loading and event delivery. See Content Security Policy. Sites without a CSP can skip those steps.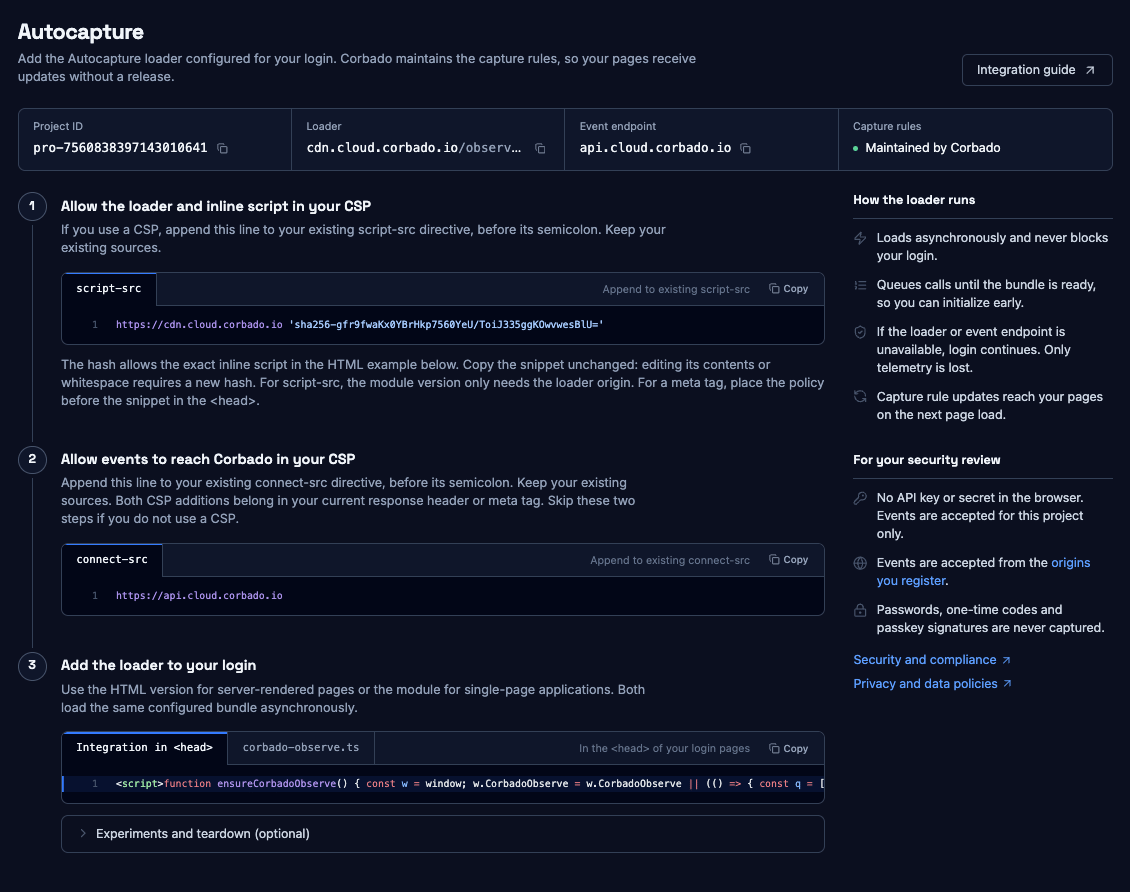
Your configured integration and optional CSP additions in one place. Example project shown.
Add the integration snippet
For an HTML integration, copy Integration in<head> from the console and place it once in <head>, before your application code and after any CSP meta tag. The snippet loads Autocapture asynchronously and starts capture.
If the console offers Script tag, copy that option into <head> or your tag manager. That configured loader starts capture on its own. Use this option only when it is offered for your project.
For a JavaScript or TypeScript application, copy the module version from the same page and call its startCorbadoObserve() function when your authentication frontend starts.
The HTML and module snippets queue initialization, experiment and teardown calls while Autocapture loads, then process them in order. For the script-tag option, agree any experiment and lifecycle hooks with Corbado when your integration is configured.
Choose when capture starts
The HTML snippet and the optional self-starting script tag start capture automatically; the module version starts capture when you callstartCorbadoObserve(). Initialize capture as soon as your authentication frontend starts, under your established collection policy. To apply a data policy based on your users’ privacy choices, agree the policy selection with Corbado when your integration is configured.
If your application owns experiment assignments, pass them when available and again when they change:
destroy() requests teardown. The supplied integration may let an in-progress authentication journey finish recording before stopping. Verify this behavior against your application lifecycle and collection policy.
Queuing lifecycle calls does not capture earlier browser activity. Install and initialize the integration early enough to observe the authentication requests and interactions you want to measure.
Configuration updates
Use Corbado’s CDN to receive managed updates to capture rules and the bundled SDK without an application release. Your loader URL stays the same; subsequent page loads receive the updated bundle, subject to browser and CDN caching. An already-open page continues using the bundle it loaded. Corbado maintains and validates the capture configuration; share planned login changes so the relevant journeys can be checked. Self-hosted or pinned deployments need their own update process. Dedicated instances can provide additional release controls.Hosted login pages: Auth0, Okta and Ping AM/AIC
Autocapture can run on hosted login pages from providers such as Auth0, Okta and Ping AM/AIC where the selected login experience supports adding the Observe snippet. Corbado configures the capture rules for the page and your customisations, using the same Autocapture capability as for a custom frontend.- Placement: Add the snippet to the hosted page where authentication takes place. A snippet on the application that redirects to that page only captures activity in the application.
- Setup: Use the provider’s supported script customisation mechanism and allow the script and API origins in the hosted page’s CSP where required. Available options depend on the provider, login experience and tenant configuration.
- Validation: Share your provider and login URL with Corbado so we can confirm the setup and verify the agreed journeys together.
4. Content Security Policy
This step is only needed if your site uses a CSP. In that case, Observe → Settings → Autocapture provides the values for your configured integration:- Script loading: A copyable
script-srcaddition containing the loader origin and one SHA-256 hash for the exact inline script, including your project ID and loader URL. - Event delivery: A separate
connect-srcaddition containing the event endpoint’s origin.
<head>. Your policy may require corresponding changes to script-src-elem or nonce-based script loading. Validate the effective policy on every authentication origin in scope.
Copy the HTML snippet unchanged: editing its contents or whitespace requires a new hash. The hash covers the inline integration, so managed loader and capture-bundle updates can continue without changing it. For script loading, the module version and optional script tag only need the loader origin in script-src; event delivery still needs the API origin in connect-src.
Experiment and lifecycle calls from an application bundle already allowed by your CSP need no additional inline-script hash. A new inline script block needs its own hash or an allowed nonce.
The browser evaluation uses an extension transport and does not require website CSP changes for that supplied setup. A successful browser evaluation therefore does not confirm that the deployed script can load or send events under your website’s policy.
5. Validate the target environment
Corbado sets up identifier capture for your login, so support can find failed attempts by the email, phone number or username a customer gives them. Agree how submitted identifiers and user IDs are sent, when clear values are hashed and when their references are deleted; see how to choose. Tracking how a field is used does not capture its value. See Users and identifiers for the distinction between an account targeted by an attempt and an authenticated user. When moving from an evaluation or staging environment, confirm the hosts, selectors, authentication endpoints and redirects with Corbado. Reuse the capture configuration where the flows match and adjust the relevant rules where they differ. Disable any browser evaluation script in your test browser before validating the deployed script. Walk each agreed journey, including failures, retries and redirects, and confirm the events and modeled outcomes under Debugging → User Search in the target project. Check delivery during page navigation and unload with the normal page transport. Also verify that authentication continues to work when the capture script or event-delivery endpoint is unavailable. Use the integration verification guide before expanding the rollout. Repeat the relevant checks when authentication changes affect configured journeys.Optional resource hints
To reduce loader connection setup time, copy the optional resource-hint snippet from Observe → Settings → Autocapture into your page’s<head>. It supplies preconnect and dns-prefetch for your loader origin. Keep the snippet unchanged, including the absence of crossorigin, so the preconnection matches the loader’s plain script request. These hints are optional; they do not replace the integration snippet or CSP setup.
6. Next steps
Verify your integration
Confirm events arrive with the expected payload.
Combine with custom events
Add events for facts that never reach the browser.