Try Demo
Talk to Adoption Engineer
Whitepaper
1. Introduction
While RPID configuration for web applications is straightforward and based on the application’s origin, native/mobile applications present unique challenges. Unlike web browsers, native/mobile applications don’t operate within the traditional concept of web origins and domains. This fundamental difference requires a special approach to establish trust between your domain and your native/mobile applications. To enable passkey functionality in native environments, you need to create a secure association between your application and your domain. This is achieved through platform-specific association files:- For iOS applications, this involves configuring an AASA (Apple App Site Association) and entitlements file
- For Android applications, you need to configure a Digital Asset Links file (referred to as Asset Links file hereafter)
2. iOS
Configuring passkey support for iOS applications requires careful setup of the relationship between your application and your RPID. This involves creating and configuring multiple components that work together to establish a secure, trusted connection.Before you test passkeys on the iOS simulator and physical devices, ensure you configure the necessary settings. For detailed instructions, refer to our iOS Testing Guide.
2.1. AASA and entitlements files
The trust relationship between your iOS application and your RPID is established through two key files:- An AASA file hosted on your RPID (domain) that specifies which applications are allowed to use passkeys for this RPID
- An entitlements file in your iOS application that declares what RPIDs it wants to use for passkeys
example.com.
2.1.1 AASA File
The AASA file is a JSON configuration file hosted on your RPID (domain):https://example.com/.well-known/apple-app-site-association
Below is an example of a complete AASA file. The crucial section for passkeys is the webcredentials object, where you specify which iOS applications (identified by their Application Identifier Prefix and Bundle ID) are authorized to use passkeys for this RPID:
T9A667JL6T is the Application Identifier Prefix and com.example.app is the Bundle ID, see below to learn more about these identifiers.2.1.2 Entitlements File
The entitlements file completes the trust circle by declaring which RPIDs your iOS application wants to access. This file must be included in your iOS application’s project:Example.entitlements
webcredentials:example.com entry. This entry tells iOS where to look for the AASA file.
2.1.3 Trust Establishment Process
The following diagram illustrates how these files work together to establish trust: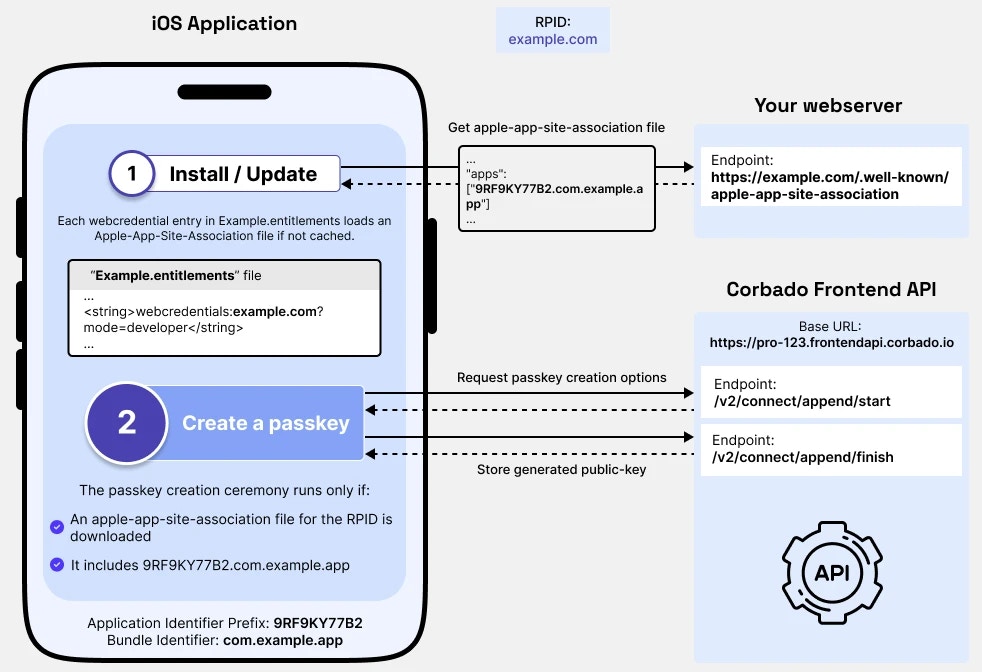
- The RPID has been configured as
example.com - The same RPID has been added to the entitlements file using the
webcredentials:prefix - When your iOS application is installed or updated:
- iOS reads the entitlements file
- Fetches the AASA file from
https://example.com/.well-known/apple-app-site-association - Verifies that your iOS application’s identifiers are listed in the
webcredentials.appssection
- If verification succeeds, your iOS application is authorized to use passkeys for the specified RPID
2.2. Application Identifier Prefix and Bundle Identifier
The AASA file references your iOS application using two unique identifiers that work together to uniquely identify your application.2.2.1 Bundle Identifier
The Bundle Identifier (or Bundle ID) is a unique identifier for your iOS application that you configure in Xcode. It follows a reverse-domain naming pattern:Best practices for Bundle IDs:
- Use reverse-domain notation (e.g.,
com.yourcompany.appname) - Only use alphanumeric characters, hyphens, and periods
- Keep it lowercase to avoid confusion
- Choose a name that will remain unique and consistent
2.2.2 Application Identifier Prefix
The Application Identifier Prefix (also known as Team ID) is a unique identifier assigned by Apple to your development team. You can find it in the Apple Developer Portal under “Membership”: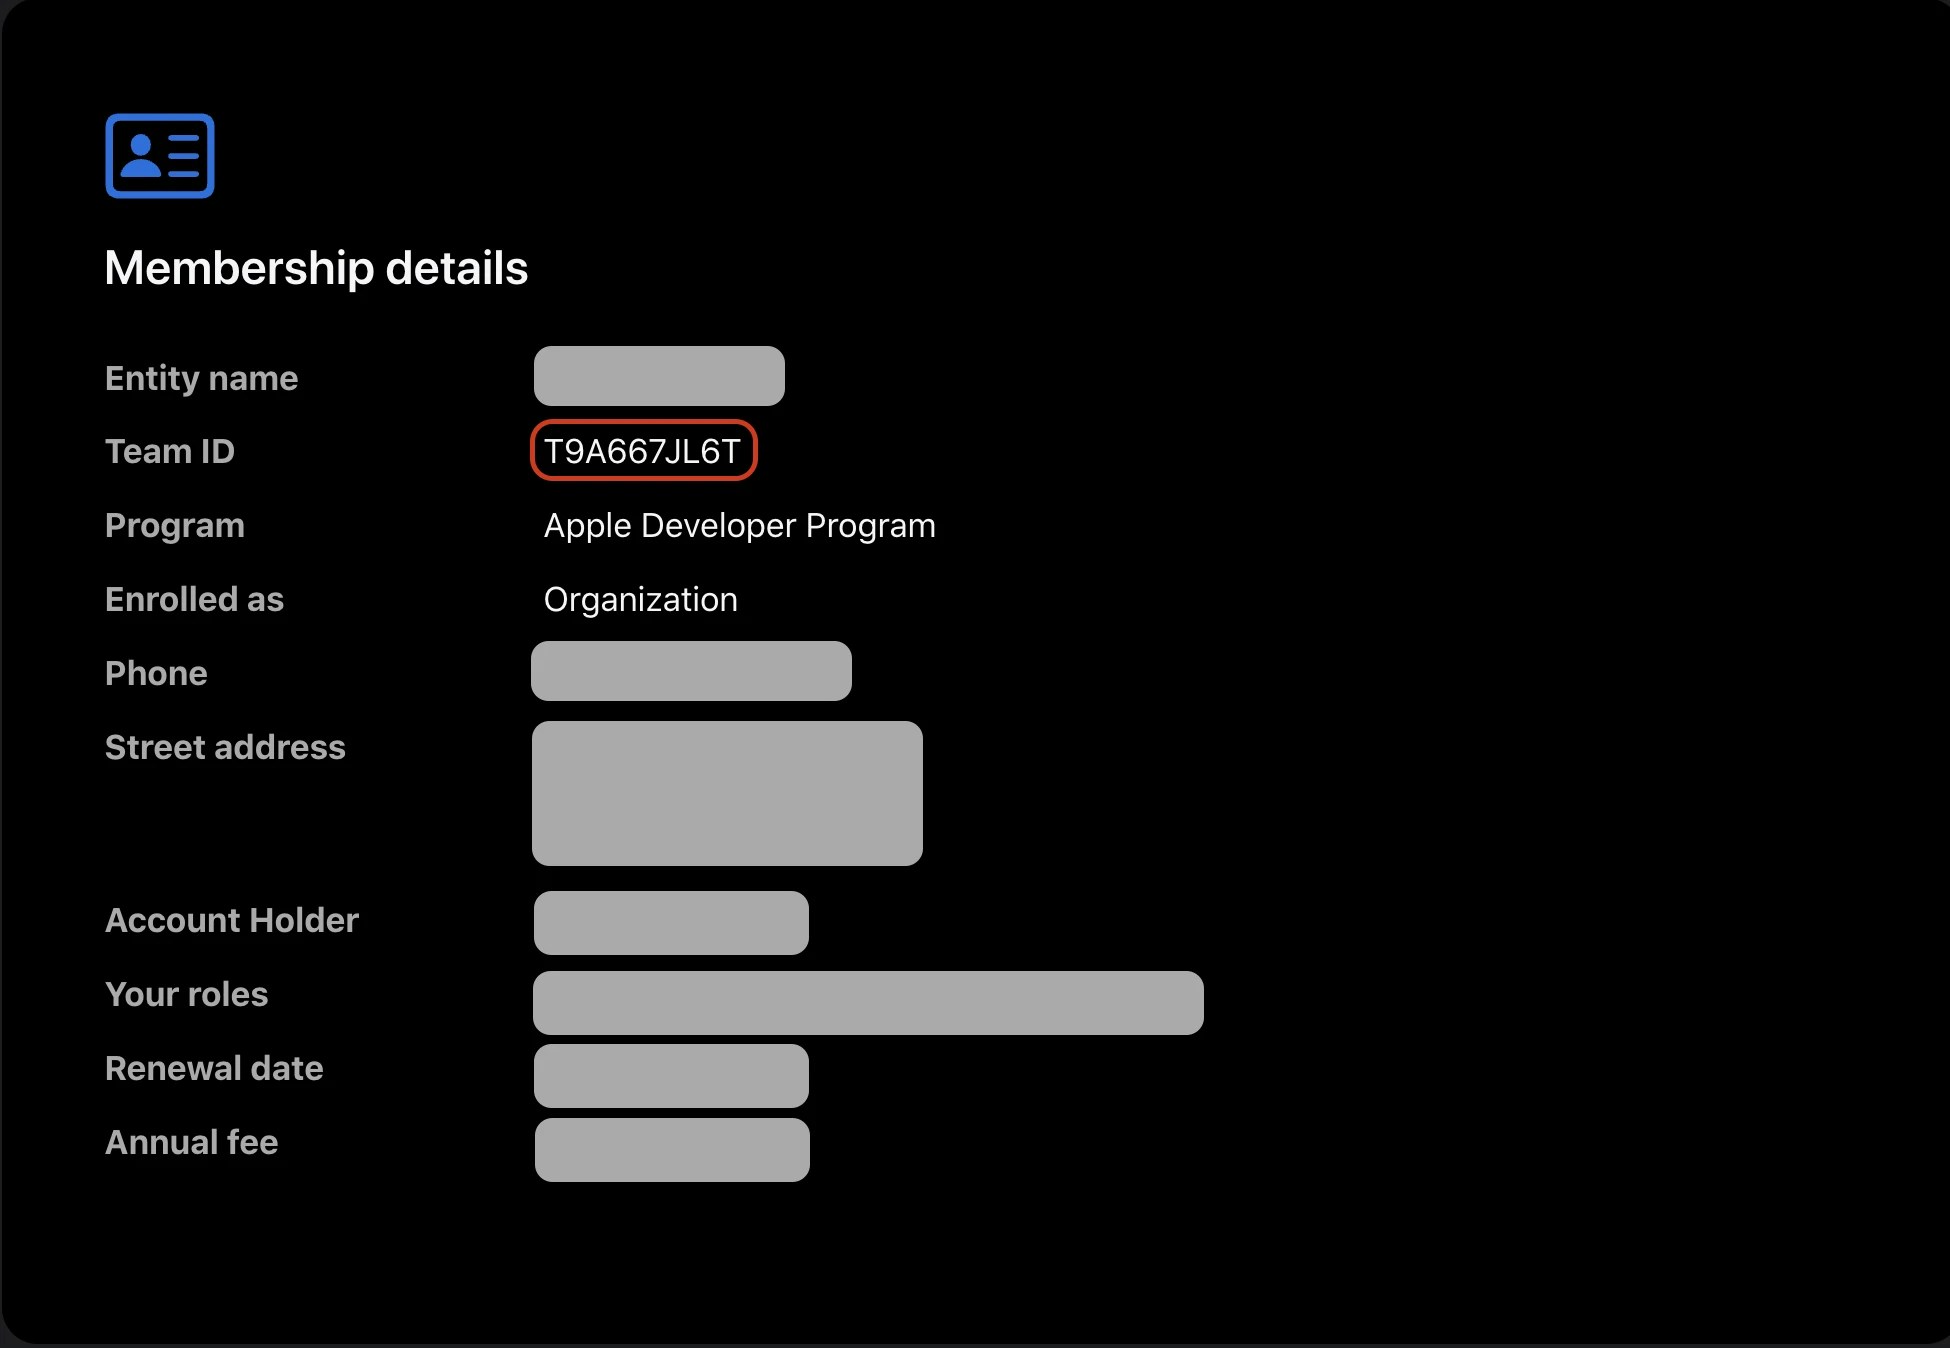
2.2.3 Combined Usage
These identifiers are combined in the AASA file forming a unique identifier for your iOS application, for example:2.3. Hosting the AASA file
2.3.1 Development Environment
For development and testing, Corbado Connect provides a pre-configured AASA file through the Corbado Frontend API:- Set your RPID to
<ProjectID>.frontendapi.cloud.corbado.io - Configure your Application Identifier Prefix and Bundle ID in the Corbado Management Console
2.3.2 Production Environment
In production, the AASA file must be hosted on your domain that matches your RPID. For example, if your RPID isexample.com, the AASA file must be accessible at:
Option 1: Static File Hosting (Recommended)
Option 1: Static File Hosting (Recommended)
- Download the AASA file from Corbado Frontend API
- Host it on your webserver at
/.well-known/apple-app-site-association - Ensure it’s served with the correct content type:
application/json
- Simple to set up
- No dependency on Corbado Frontend API
- Better performance
- Works even if Corbado Frontend API is temporarily unavailable
- You have to manually update the file
Option 2: Proxy Configuration
Option 2: Proxy Configuration
Create a proxy rule on your webserver to forward requests to Corbado Frontend API:Nginx Example:Advantages:
- Always serves the latest version
- No need to manually update the file
- Depends on Corbado Frontend API availability
- Slightly higher latency
- More complex configuration
3. Android
Configuring passkey support for Android applications requires establishing a trust relationship between your application and your RPID. This involves creating and configuring specific files and settings to verify your application’s ownership of the domain.Before you test passkeys on the Android emulator, ensure you configure the necessary settings. For detailed instructions, refer to our Android Testing Guide.
3.1. Asset Links file and keystore
The trust relationship between your Android application and your RPID is established through two key components:- An Asset Links file hosted on your RPID (domain) that specifies which applications are allowed to use passkeys for this RPID
- A keystore file in your Android application that contains the certificate used to sign your application
example.com.
3.1.1 Asset Links File
The Asset Links file is a JSON configuration file hosted on your RPID (domain):https://example.com/.well-known/assetlinks.json
Below is an example of a complete Asset Links file. The crucial section is the delegate_permission/common.get_login_creds relation, which authorizes specific Android applications (identified by their Package Name and SHA-256 Certificate Fingerprint) to use passkeys for this RPID:
com.example.app is the Package Name and the SHA-256 string is your application’s Certificate Fingerprint, see below to learn more about these identifiers.3.1.2 Keystore File
The keystore file is a container that stores your application’s signing certificates. Android requires all applications to be digitally signed with a certificate before they can be installed. This certificate, stored in the keystore, is used to generate the SHA-256 Certificate Fingerprint that appears in the Asset Links file. You typically have two keystores:- A debug keystore (automatically created by Android Studio)
- A release keystore (that you create for production releases)
build.gradle file:
3.1.3 Trust Establishment Process
The following diagram illustrates how these components work together to establish trust: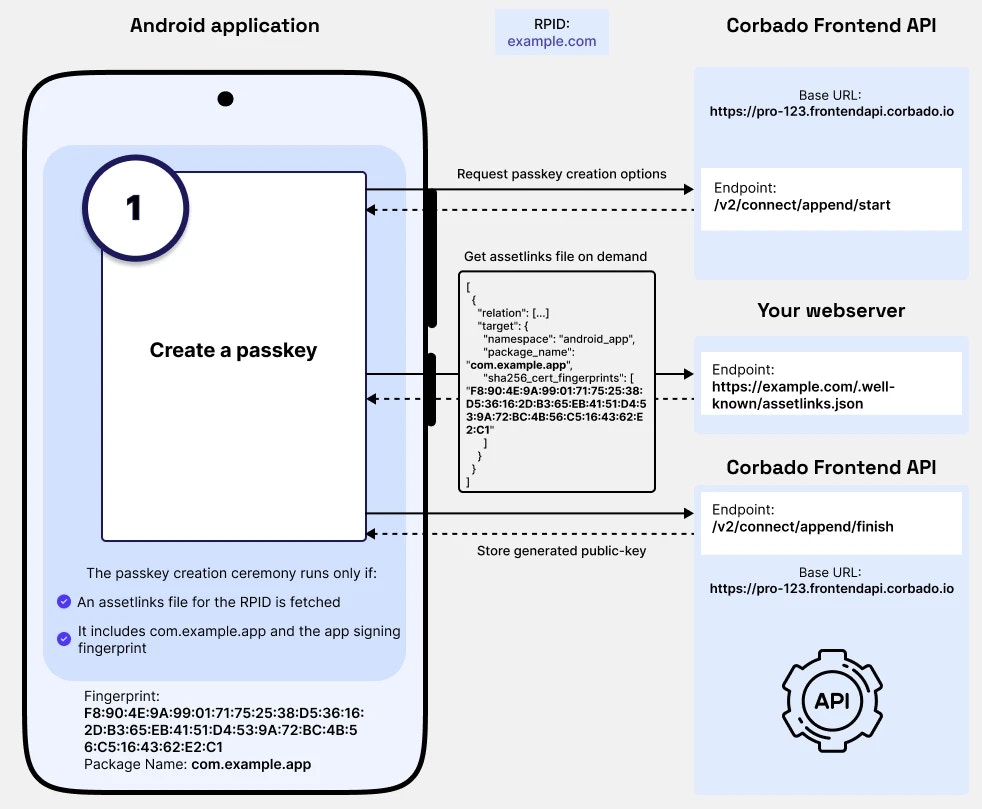
- The RPID has been configured as
example.com - Your Android application is signed using the certificate from your keystore
- When your Android application attempts to use passkeys:
- Android fetches the Asset Links file from
https://example.com/.well-known/assetlinks.json - Calculates the SHA-256 fingerprint of your application’s signing certificate
- Verifies that your application’s Package Name and Fingerprint are listed in the file
- Android fetches the Asset Links file from
- If verification succeeds, your Android application is authorized to use passkeys for the specified RPID
3.2. Package Name and Fingerprint
The Asset Links file references your Android application using two unique identifiers that work together to uniquely identify your application.3.2.1 Package Name
The Package Name is a unique identifier for your Android application that you configure in yourbuild.gradle file. It follows a reverse-domain naming pattern:
Best practices for Package Names:
- Use reverse-domain notation (e.g.,
com.yourcompany.appname) - Only use lowercase letters, numbers, and dots
- Choose a name that will remain unique and consistent
- Avoid using underscores or hyphens
3.2.2 Fingerprint
The SHA-256 Certificate Fingerprint is a hash of the certificate used to sign your Android application. You can obtain it using the following command:3.3. Hosting the Asset Links file
3.3.1 Development Environment
For development and testing, Corbado Connect provides a pre-configured Asset Links file through the Corbado Frontend API:- Set your RPID to
<ProjectID>.frontendapi.cloud.corbado.io - Configure your Package Name and Certificate Fingerprint in the Corbado Management Console
3.3.2 Production Environment
In production, the Asset Links file must be hosted on your domain that matches your RPID. For example, if your RPID isexample.com, the file must be accessible at:
Option 1: Static File Hosting (Recommended)
Option 1: Static File Hosting (Recommended)
- Download the Asset Links file from Corbado Frontend API
- Host it on your webserver at
/.well-known/assetlinks.json - Ensure it’s served with the correct content type:
application/json
- Simple to set up
- No dependency on Corbado Frontend API
- Better performance
- Works even if Corbado Frontend API is temporarily unavailable
- You have to manually update the file
Option 2: Proxy Configuration
Option 2: Proxy Configuration
Create a proxy rule on your webserver to forward requests to Corbado Frontend API:Nginx Example:Advantages:
- Always serves the latest version
- No need to manually update the file
- Depends on Corbado Frontend API availability
- Slightly higher latency
- More complex configuration